GUIDE · PILLAR
Property snagging in Dubai: what it is and how it works
Snagging is the inspection of a newly built home for defects before you accept handover. An inspector, or the buyer, walks the unit, records every snag with a photo and its location, and sends the list to the developer to fix. A re-inspection then confirms each fix before the keys are handed over.
What is property snagging?
Property snagging is a structured inspection of a newly built apartment, villa or townhouse to find defects before the owner accepts handover. A “snag” is any item that is incomplete, damaged or not built to an acceptable standard: a chipped tile, a door that does not latch, a tap that leaks, a socket with no faceplate. The inspector works through the property room by room, tests what moves, opens, drains and switches on, and records each snag with a photo, a short description, its exact location and how serious it is. The result is a snag list, usually issued as a snagging report, which the buyer or their inspector sends to the developer’s handover team. The developer’s contractors fix the items, and a second visit, often called de-snagging or re-inspection, checks that each fix is done. Snagging is about workmanship and finishing, not valuation: it tells you what needs to be put right, not what the home is worth.
The word comes from British construction, where a “snag” is a small fault found at the end of a job. In the UAE the term is used by developers, contractors, inspection firms and buyers alike, and “snagging report” and “snag list” mean the same document.
When does snagging happen in a Dubai handover?
Snagging happens in the window between the developer telling you the unit is ready and you accepting the keys. In a typical off-plan purchase the sequence looks like this:
- Completion and handover notice. The developer finishes the building, obtains the completion paperwork and sends buyers a handover notice with the steps and dates for their unit.
- Inspection appointment. You, or a snagging firm acting for you, book a time to inspect the unit. Utilities are normally connected by then, so lights, sockets, water and air conditioning can be tested.
- Snagging inspection. The unit is inspected and the snag list is prepared.
- Report to the developer. The report is submitted through the developer’s process, often a handover portal, an email address or a form at the handover desk.
- Fixes. The developer’s contractors work through the list.
- Re-inspection. The unit is checked again against the same list. Anything still open goes back to the contractor.
- Handover. You sign the handover documents and receive the keys.
How long each step takes, how many inspections you are allowed before handover, and what happens to snags found after you move in are set by your sale and purchase agreement (SPA) and the developer’s handover notice. They differ between developers and projects, so read both documents before you book the inspection, and keep copies of everything you submit.
The fourth quarter of the year is usually the busiest time for handovers in Dubai, so inspection slots with snagging firms fill up early. If your handover notice has arrived, book the inspection as soon as the developer confirms the unit is accessible.
Who carries out a snagging inspection?
Four groups do snagging in the UAE, and each looks at the unit from a different side of the handover.
| Who | Works for | What they focus on | Typical output |
|---|---|---|---|
| The buyer (DIY) | Themselves | Visible defects in their own unit | A list with photos sent to the developer |
| An independent snagging firm | The buyer or an investor | A full inspection with tools, often including MEP and moisture checks | A branded snagging report, then a re-inspection report |
| The developer’s QA team | The developer | Every unit in a tower before buyers arrive | Snag registers per unit, zone and contractor |
| The main contractor and subcontractors | The developer | Closing the snags assigned to them | Fixes with photo proof, marked done |
On a well-run project these lists meet: the developer’s QA team snags each unit first, contractors close those items, and the buyer’s inspection then finds what is left. In practice buyers often find items the developer’s own checks missed, which is why independent snagging exists at all.
What does a snagging inspection cover?
A thorough inspection covers every room and every system that came with the unit. Inspectors usually work in a fixed order so nothing is skipped, and they test rather than just look.
- Finishes: walls, ceilings, paint, skirting, floor tiles, grout, joinery, wardrobe doors and worktops.
- Doors and windows: alignment, gaps, latches and locks, handles, door stoppers, sliding door tracks, seals, glass and frames.
- Kitchen: cabinets and hinges, worktop joints, the sink and its sealant, taps, the hob, oven and extractor if supplied.
- Bathrooms: WCs, basins, showers and baths, drainage, falls to the drain, silicone, grout, extract fans, water pressure and hot water.
- Electrical: every light and switch, every socket, faceplates, the distribution board labelling, and any exposed wiring.
- Air conditioning: each unit cooling, thermostats responding, grilles aligned, condensate not dripping.
- Balconies and terraces: balustrades and glass, floor falls and drains, the sliding door threshold and track.
- Service areas: the laundry, the maid’s room and its bathroom, storage cupboards.
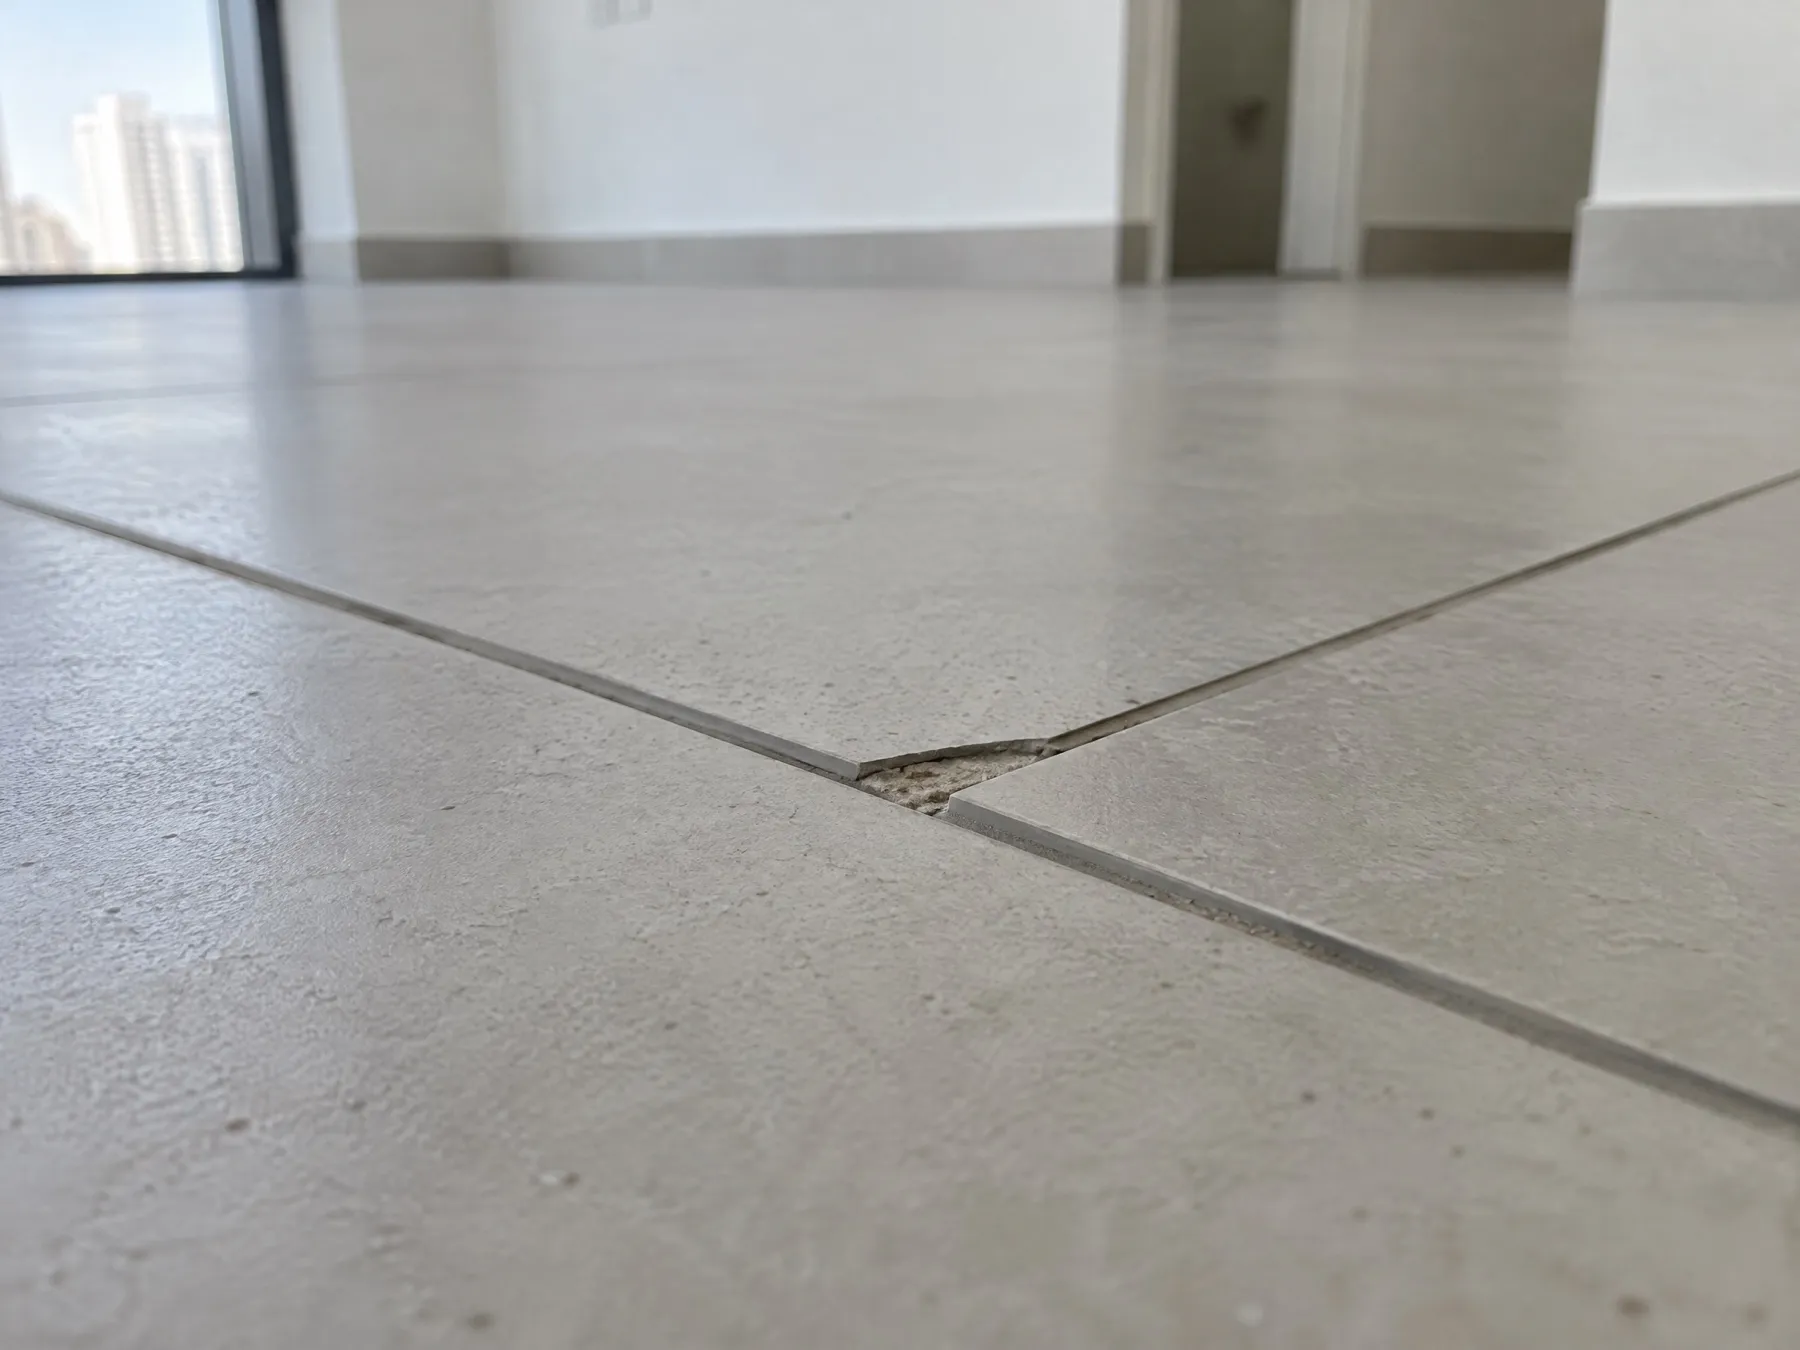
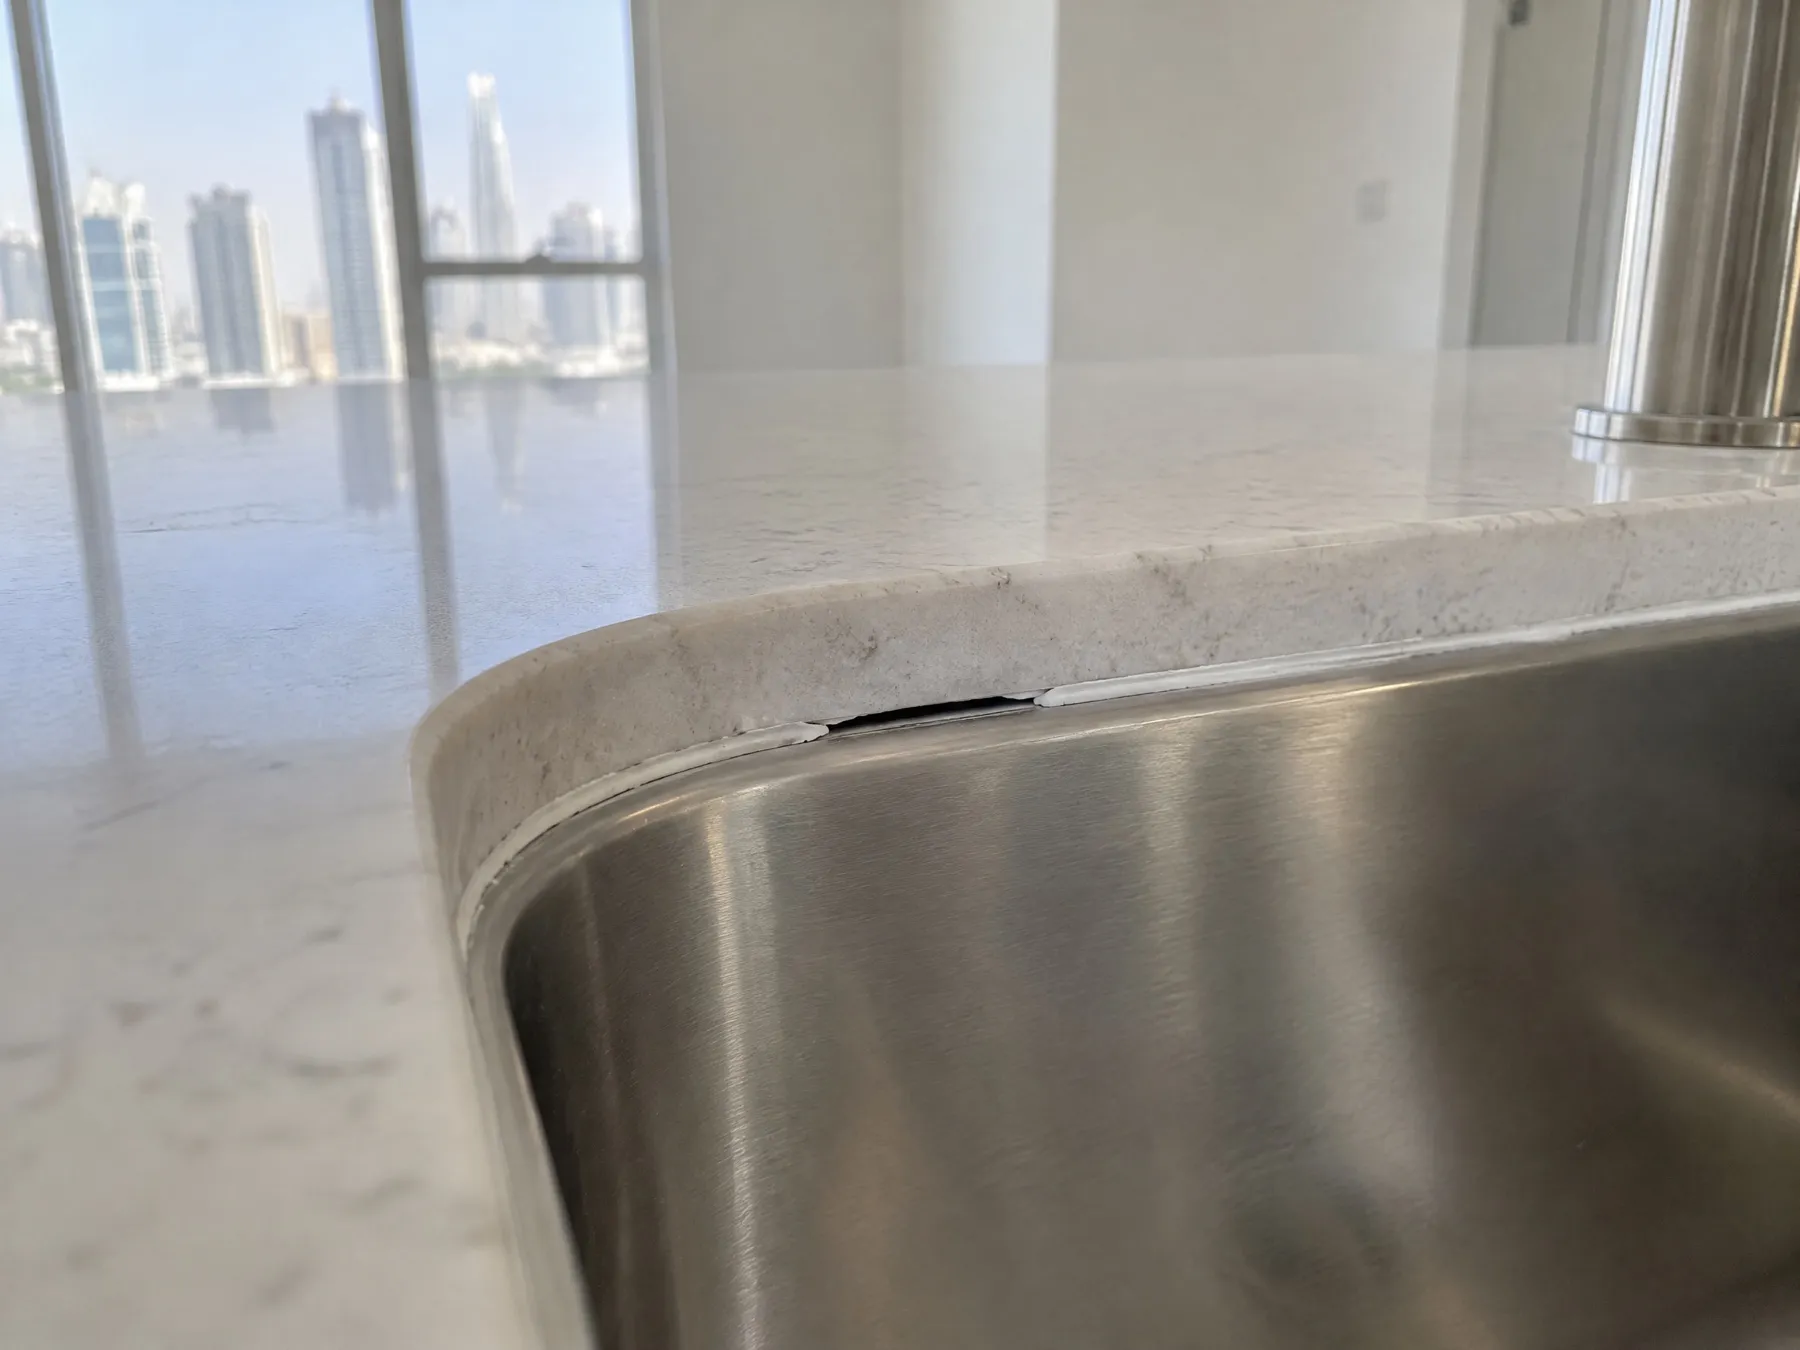
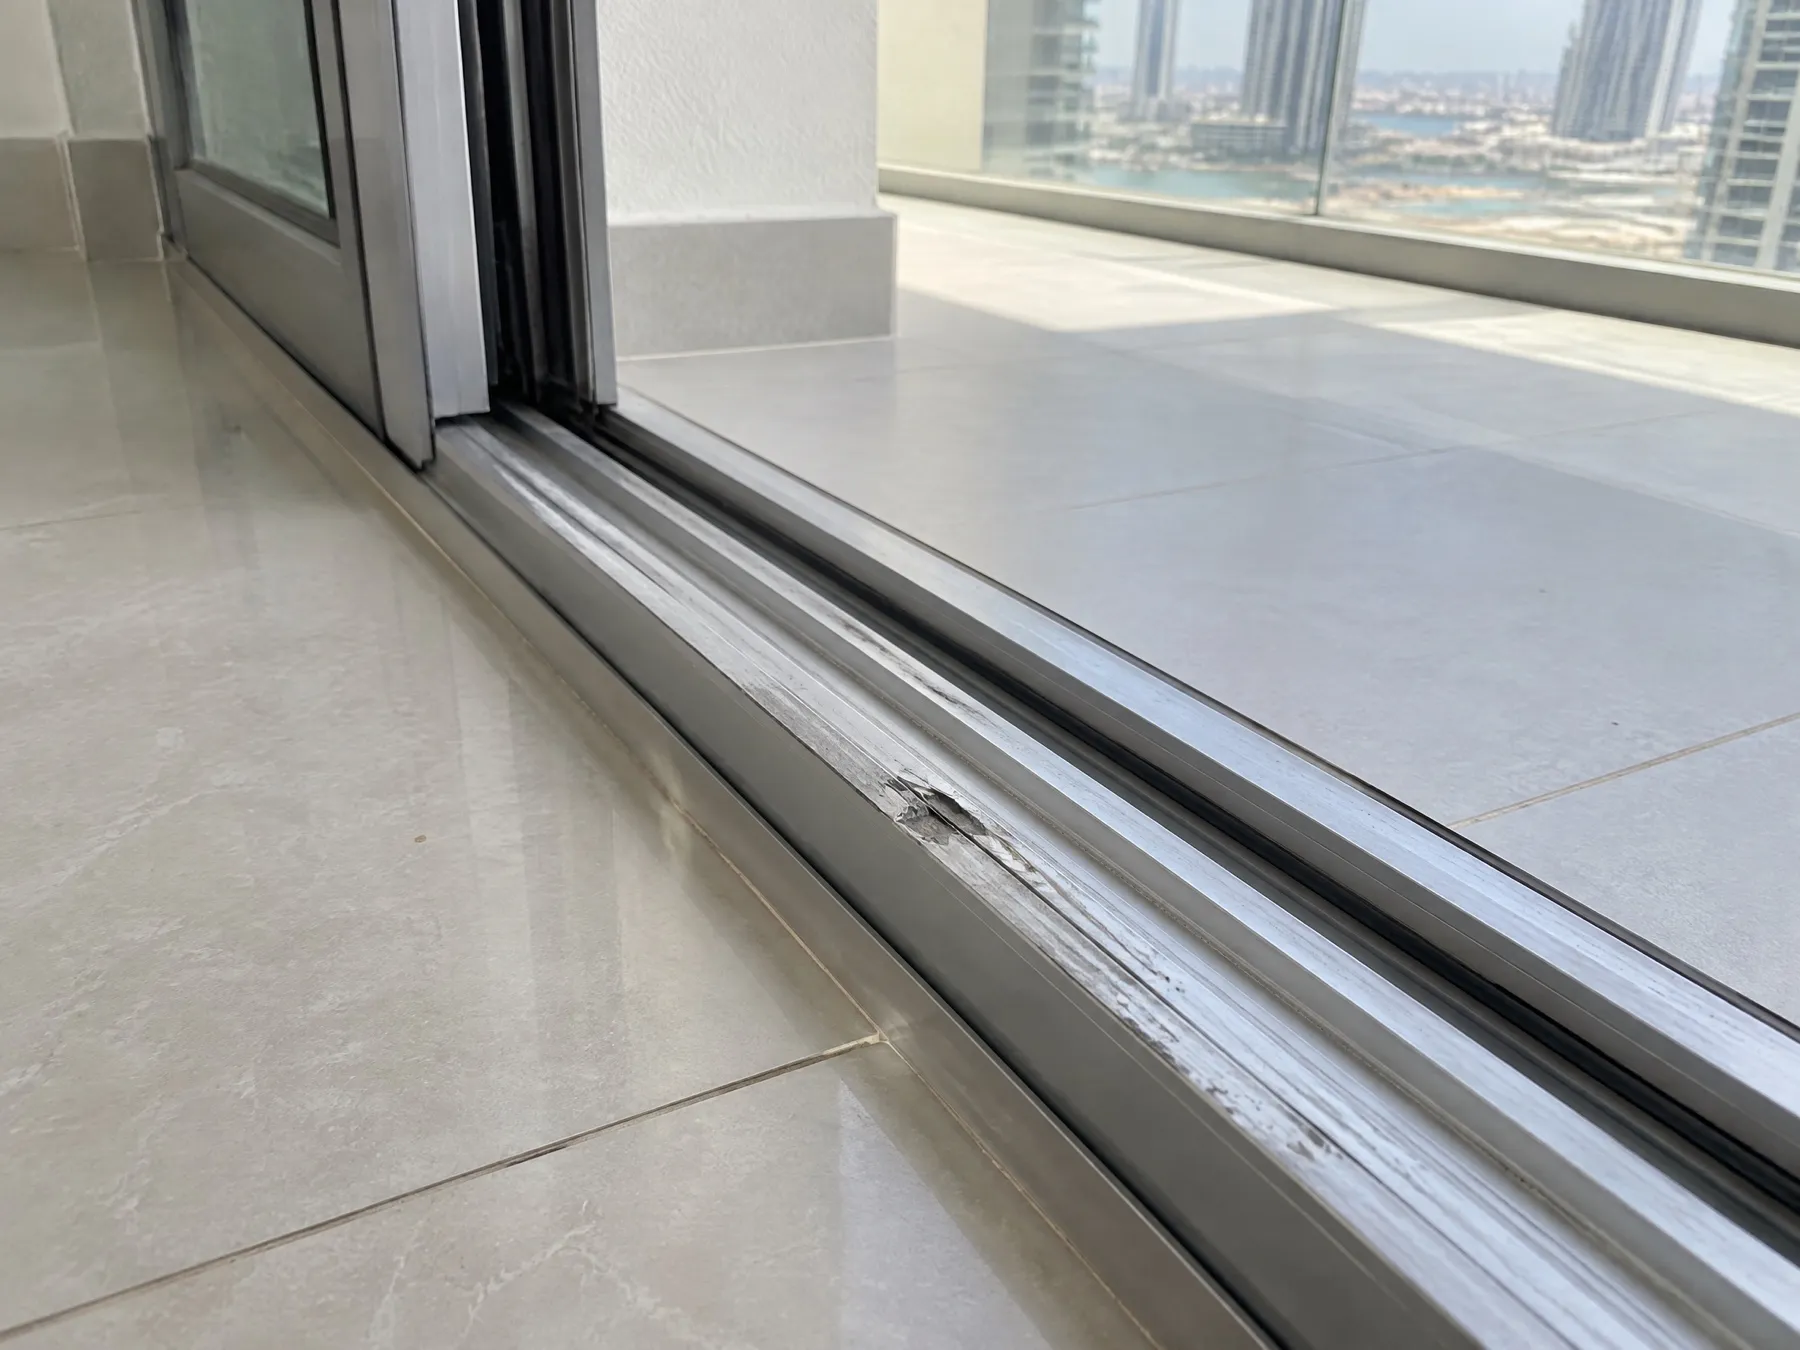
Three snags that are easy to miss without testing: a chipped tile edge at a joint, a break in the sink’s silicone bead, and a scratched balcony door track.
Some firms add checks with instruments, such as a moisture meter on walls next to wet areas, a thermal camera for hidden leaks and AC performance, or a socket tester for wiring polarity. Ask what your inspector includes, because it changes what the report can tell you. For a full list with what to look for and how to test each item, use our room-by-room snagging checklist.
What is different when you snag a villa or townhouse?
A villa has everything an apartment has, plus the outside of the building and the plot around it, which the developer’s facilities team would look after in a tower. Inspectors add:
- Roof and terraces: the waterproofing finish, drains and outlets, parapets and any roof-mounted equipment.
- External walls: cracks in the render or cladding, gaps around window and door frames, and staining that suggests water getting in.
- External works: paving levels and falls away from the house, boundary walls, gates, the driveway and any landscaping that came with the unit.
- Garage and car port: doors, lighting, floor finish and drainage.
- Pool, if supplied: tiles and coping, the pump room, and whether the equipment runs.
- Stairs and balustrades: firm fixings, consistent riser heights and handrails along every flight.
- Services outside the house: external sockets and lights, irrigation points, water tanks and any outdoor AC units.
Because a villa takes longer and needs ladders and access to the roof, ask whether the inspection fee and the time on site cover the outside as well as the inside.
How long does a snagging inspection take?
It depends on the size of the property, how many systems need testing and how many snags there are. A small apartment can be done in a single visit of a few hours; a large villa can take a full day. Recording is what takes time: each snag needs a photo, a location, a description and a grade. Inspectors who capture snags on a phone as they go, rather than writing notes and typing them up later, can usually issue the report the same day. Plan the visit for daylight hours, with utilities connected, and allow time to walk round once more at the end to check you have not missed a room.
How are snags graded?
Not every snag matters equally, so most reports give each one a severity. SnagOwl uses three levels, and the same definitions drive the app’s suggestions:
| Severity | What it means | Examples |
|---|---|---|
| Minor | A cosmetic or small finishing defect with no effect on use, safety or durability | Paint touch-up, light scratch, uneven sealant, missing door stopper |
| Major | Affects function, durability or water-tightness, or is clearly visible and unacceptable to the occupant, but is not an immediate danger | Leaking tap or trap, door that does not close or lock, cracked tile, AC not working, missing sealant at a wet area |
| Critical | A hazard to safety or health, a risk of serious damage, or it stops the space being used or handed over | Exposed live wiring, active leak onto electrics, missing balustrade or handrail, gas smell |
Severity helps everyone prioritise. The developer can send critical items to the right trade first, and the buyer can decide which open items they would accept at handover and which they would not. The grade should follow from what the defect does, not how it looks: a hairline gap in grout is minor on a living-room floor but can be major behind a vanity, where water gets in. Our guide to snag severity explains the three levels with a decision table.
What is de-snagging, and how does the re-inspection loop work?
De-snagging is the follow-up visit that checks whether the snags in the first report have been fixed. It turns a list of problems into a record of what was closed. The loop usually runs like this:
- The inspector issues the first report, round 1, with every snag numbered.
- The developer assigns the snags to its contractors, who fix them and mark them done, ideally with a photo of the fix.
- The inspector walks the unit again with the round 1 list and marks each snag fixed, still open or not inspected (for example, when a room was locked).
- Anything new found during the visit is added as a new snag.
- A round 2 report is issued showing what changed, and the loop repeats until the buyer is satisfied or the handover terms say otherwise.
Keeping the same reference number for each snag across rounds is what makes this work. Without it, every round becomes a new argument about which item is which. In SnagOwl each snag keeps its reference, and every round’s verdict is stored against it.
What should a good snagging report contain?
A useful report lets someone who has never seen the unit find each snag, understand it and fix it. At a minimum it should include:
- the property details: project, building, unit number, the date of the inspection and the round;
- the inspector or firm, and who the report is for;
- a summary: the number of snags, broken down by severity and by area;
- for every snag: a reference number, a clear title, a description of what is wrong, the room and exact location, the severity, at least one photo with the defect marked, and the contractor responsible if known;
- for re-inspections, the verdict on every earlier snag;
- a place for signatures when the report is accepted.
Developers often prefer an Excel register as well as the PDF, so their teams can sort and assign snags. We go through every field, with an annotated sample, in what a professional snagging report contains.
What are the most common snagging mistakes?
Most disappointing snagging outcomes come from a handful of avoidable mistakes:
- Inspecting without power or water. Without utilities you cannot test lights, sockets, taps, drainage or air conditioning, which hides some of the most important snags.
- Vague descriptions. “Paint bad in bedroom” will come back as fixed. “Paint drip on the wall to the left of the bedroom 2 door, at shoulder height” will not.
- No location. A photo without a room and position forces the contractor to search, and searching is where items get missed. A floor-plan pin removes the doubt.
- Everything marked as urgent. If every snag is critical, nothing is. Grade honestly so the real hazards get fixed first.
- Skipping the re-inspection. A list without a second visit only tells you what was wrong, not what was fixed.
- Missing the deadlines in your documents. Your SPA and handover notice may set dates for submitting snags. Note them before the inspection.
- Signing on the day without reading. Take time to check what you are signing and whether it lists the snags still open.
What happens to snags found after handover?
Some defects only show up once you live in a home: a slow leak under a basin, an AC unit that cannot keep up in summer, a crack that opens as the building settles. Whether the developer must fix them, how you report them and how long that responsibility lasts are set by your sale and purchase agreement and, in many contracts, a defects liability period. Read those terms before handover so you know the process. When you find something, record it the same way you would during snagging: a photo, the room and position, a clear description and the date you noticed it, then report it in writing through the channel your developer gives you. Keep your original snagging report too, because it shows what was, and wasn’t, there on the day you took the keys.
Should you snag your own home or hire a snagging firm?
Both work, and the right choice depends on the property, your time and how comfortable you are testing things.
| What matters | DIY snagging | Snagging firm |
|---|---|---|
| Cost | Your time, plus any app or checklist you use | A fee per inspection, usually set by unit size and type |
| Tools | A phone, a torch, a spirit level and a socket tester at most | Moisture meters, thermal cameras, testers and ladders |
| Knowledge | You learn as you go with a checklist | Inspectors who snag units every week |
| Report | Your own list and photos | A structured report the developer is used to receiving |
| Best for | Smaller apartments, buyers with time and a careful eye | Villas, larger units, investors abroad and anyone short on time |
If you do it yourself, use a checklist so you cover every room in the same order, take your time in daylight, and record each snag with its location. SnagOwl’s homeowner plan gives you a guided checklist and a report your developer can act on for AED 99 per unit. If you hire a firm, ask for a sample report before you book, ask whether the price includes a re-inspection, and check which instruments they use.
How do snagging firms run inspections at scale?
A snagging firm with several inspectors and dozens of units a month has a different problem from a single buyer: keeping every report consistent, getting it out the same day and tracking what the contractor has closed. Most firms that grow past a few inspectors move from spreadsheets and photo folders to a snagging app. The things to look for are offline capture (new towers and basements often have no signal), photo markup, floor-plan pins, templates for each property type, contractor access that does not cost extra per user, re-inspection rounds and branded reports in the languages your clients need. SnagOwl was built around exactly that loop; see pricing for teams.
Key snagging terms
| Term | Meaning |
|---|---|
| Snag | A single defect: incomplete, damaged or below an acceptable standard |
| Snag list | The list of snags for one property, also called a punch list in some countries |
| Snagging report | The document that presents the snag list with photos, locations and severity |
| De-snagging | Re-inspecting a property to confirm the snags were fixed |
| Handover | The point when the developer hands the finished property to the buyer |
| Handover notice | The developer’s notice that a unit is ready, with the steps and dates for handover |
| SPA | The sale and purchase agreement between the buyer and the developer |
| Defects liability period | A period after completion during which the developer remains responsible for certain defects; its length and scope are set in your contract |
| MEP | Mechanical, electrical and plumbing systems |
Rules and timelines in this guide are general. Your SPA and the developer’s handover notice decide what applies to your unit, so check them first.